
Dont forget about the footsteps!!! Coded the footsteps in. Pretty simple. Add an event to whatever animations need be. Then your script handles this event. So in the script you can do cool stuff like change the sound to a different surface. And only ever have to set up the animation once. I did not get around to coding in different sounds. Only sand (default) and sometimes a clang sound happens.
Wednesday, 6 May 2015

It was time to create the low-poly model of the statue and add some textures.
I took my highpoly model, and retopologised it and created a low poly model, then unwrapped it.

I had to play around with the zRemesh tool as I was getting a few spirals when I was remeshing the model, but I managed to fix it in the end with a bit of experimentation.
I followed the usual process and created my textures in dDo:

The albedo map was pretty simple for this one, as most of the detail was going to come from the normal and AO maps.

I still want to work on the textures a bit until the degree show. The normals came out well but I feel I can do better with the actual mateial on the model.
I also aim to a few versions of the model, one in a pose. But this will be for the final polish for the show.
I'm happy with how quickly this model came together, and would like to work a bit more on it to get that extra polish.
The construction of the final scene started with the final terrain. This included the rocks and the floor. From here, it was about populating it with props and gameplay elements. Some elements I received with the terrain, such as the placement of the climb blocks. But I had to go around and put a climbing collider on them, and the same with the grapple climb blocks. I received the foliage and the barriers in one prefab which was easy enough to put into place. Most of the other prefabs were of signular items for me to place around such as the ruins and other props. A majority of the gameplay elements were received in one prefab. This one was definitely the most time consuming to sort out...
For starters, for some reason, the prefab didnt come over in place, so this meant having to realign it by eye. Every puzzle had to be realigned in some way. Amongst this, I had to set up all the grapple pull points for each object (pullable planks, blocks etc) so they would work with my grapple system.
Another problem was most of the animations for the pull actions (platorms moving, falling etc) came across messed up due to the positioning problem, so I ended up re doing all of them aswel. They slowly decrease in quality as your progress through the level! TIME IS A BITCH
The other other problem was the lightmapping. I wanted to use Unitys realtime global illumination system to generate the indirect light etc. This still involves baking light maps. To clarify there, it still requires the baking of light maps, just fancy real time light maps. It literally took 2 weeks to finally get a build of the light maps. It turns out the size of the terrain floor were simply too big for the system to handle. Once I removed them from the baking, it finally worked... Still took around 7 hours tho!
After the lightmaps finish baking, you can then place light probes. These light up non static object with all the nice and fancy bounce light etc. This is how you get global illumination on dynamic objects. They themselves require baking (really fast) and also require light maps (real time or static) to be baked to work properly.
 I only managed to place this many of them. Would have been cool to do the whole level, but maybe another time now.
The last annoying issue I can remember was that screen spaced ambient occlusion crashes my version of Unity 5
.png)
.png)


Lighting. Lightmaps. Baked GI is off as you can see. Realtime is ON. Auto is turned off to stop any potential of unity being like "hey im going to fuck you up and delete your shit". I want my lightmaps, and i want them on
 Mecanim. Lines arrows states names blending, all of the parameters orange red green. Tripple arrows, more blending, blending blends with blending
 Blend tress, the ultimate blending experience, blend everything together in one magnificent blending orgy. Parameters. Parameters control the blending. Code the parameters in the scripts to control ALL OF THE BLENDING
 Occlusion culling. Very good. Very helpful. Dont touch any settings, press bake and you're fine. Saves loads of draw calls etc. That was sarcasm, I should have probably played around with the settings. But hey, it saved a lot of draw calls and a lot of FPS at the end of the day
Camera smoothing, I added camera smoothing aswel as transitions and occlusion checking to make sure the camera doesnt clip throught objects
I coded a random lightning script. With sound. Headbanging. Combine the two together. Then I could listen to metal and stand somewhere cool.
I really thought the lamposts were fine. They were untextured and the base was red (as a materal test). But I was aiming for the contrast between the ancient ruins and the modernism. The giant ice cream I get, I really do, but its just too good on another level to not include. It has googly eyes that actually google. But the lamposts when textured and with some other modern urban objects, I think would look pretty cool. Conveys the sense of time and space being torn apart and deep shit like that and armilary spheres etc
So tired
Need to export this thing now as a PDF :(
For starters, for some reason, the prefab didnt come over in place, so this meant having to realign it by eye. Every puzzle had to be realigned in some way. Amongst this, I had to set up all the grapple pull points for each object (pullable planks, blocks etc) so they would work with my grapple system.
Another problem was most of the animations for the pull actions (platorms moving, falling etc) came across messed up due to the positioning problem, so I ended up re doing all of them aswel. They slowly decrease in quality as your progress through the level! TIME IS A BITCH
The other other problem was the lightmapping. I wanted to use Unitys realtime global illumination system to generate the indirect light etc. This still involves baking light maps. To clarify there, it still requires the baking of light maps, just fancy real time light maps. It literally took 2 weeks to finally get a build of the light maps. It turns out the size of the terrain floor were simply too big for the system to handle. Once I removed them from the baking, it finally worked... Still took around 7 hours tho!
After the lightmaps finish baking, you can then place light probes. These light up non static object with all the nice and fancy bounce light etc. This is how you get global illumination on dynamic objects. They themselves require baking (really fast) and also require light maps (real time or static) to be baked to work properly.
The last annoying issue I can remember was that screen spaced ambient occlusion crashes my version of Unity 5
It really,
Really did
The last few days consisted of me being back and forth between whatever task springed to mind. Tweaking this collider, tweaking that one. Redoing this because something went wrong somewhere somehow.
Im so tired right now I havent slept in like 40 hours. So heres some screenshots and words so I can hopefully sleep knowing that I maybe covered everything I've done
Input manager, think i already did this one, nice and helpful tho. The only problem is it doesnt serialize properly with prefabs but its easily overcomeable by clicking the update prefab button. Thats meant to sound confusing
Lighting. Lightmaps. Baked GI is off as you can see. Realtime is ON. Auto is turned off to stop any potential of unity being like "hey im going to fuck you up and delete your shit". I want my lightmaps, and i want them on
Camera smoothing, I added camera smoothing aswel as transitions and occlusion checking to make sure the camera doesnt clip throught objects
I really thought the lamposts were fine. They were untextured and the base was red (as a materal test). But I was aiming for the contrast between the ancient ruins and the modernism. The giant ice cream I get, I really do, but its just too good on another level to not include. It has googly eyes that actually google. But the lamposts when textured and with some other modern urban objects, I think would look pretty cool. Conveys the sense of time and space being torn apart and deep shit like that and armilary spheres etc
So tired
Need to export this thing now as a PDF :(

As we were coming up to deadlines, I wanted to add one more model to the game. Which is the Warmongering Statue - one of the interactable objects that the player can trigger memories off.
I was inspired by the armour and design of the terracotta soldiers:
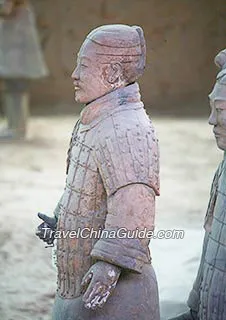

I wanted this to be a quick model as we had deadlines approaching.
I decided to model it in zBrush. I begun with a base mesh, then used the extract mesh tool to mask and pull out geometry.

After extracting a new subtool, I used the move tool and zRemesh tool to stretch it out and make it into the underskirt of the statue.
I should note here I made the mistake of ticking the 'double' sided option when extracting the models, which resulted in some really terrible extractions, and was a pain to retopologise. Thankfully I managed to fix it, but in future I know not to check that option.

I extracted again to create the trousers and scarf for the character.
I started following the terracotta soldiers' armour design here - with the breast plate over the skirt and a scarf around the neck.

I then extracted a mesh for the shoulders - though they looked rather soft and not very hard edged.

I started adding detail at this point, using the damStandard brush to add the criss-cross pattern to the armour.

The next step was to use an alpha to add the bolts to each part of the pattern.

This was quite fiddly as I had to do it all by hand, but it paid off well I thought - and was more accurate overall. I doubt there would be an automated process for this.
I was getting sick of trying to model the shoulder pads in zBresh, so I made a mesh in 3ds max.

I used some standard primitives to create the shoulderpads, but I think they came out quite well overall.
I then started adding further detail to the statue's 'clothing'.

I began introducing the polish brushes here to try and create a more hard edged and rock like feel to the mesh. I started by trimming the corners to square off the model.
As with the shoulder pads, I got sick of trying to model the boots in zBrush, so I did a low poly in 3ds max and sent it over.

I added some further detail to the hair and face.

I did not add too much to face, just tried to keep it squarer and beveled.
Next part was the fun part. I used alphas and brushes to add cracks and dent to the model. I used the polish brush to further harden the edges of the model to make it more statue like!

Considering this was a really quick model, I'm pleased with the results.
I'm discovering more tools with zBrush and I'm really enjoying how they are improving my workflow. I think if I had more time I would like to work more on his face - make it more oriental to match the terracotta theme. But I'm happy with the detail I've achieved in a short time.

When it came to finishing the Main character's model and textures, I made a few additions to the hair first:

It wasn't much but I moved around and added some more planes, to further bulk up the hair, and make it less blocky/dreadlock-like. The intention was to add more layers with the alpha maps, namely through the strands flicking off his head.
When it came to texturing the character I wanted to push for more color variation:

That being said, I didn't want to overwhelm the player with too many characters on the outfit. Instead I choose three primary colors for the fabrics and a brass material for metal. I felt his worked well as it helped to create some nice variation in the character's outfit - the cloth and leather complimenting each other.
For my renders I used the control rig Nik made to pose my character:

I then sent the model over to Marmoset.


I'm pleased with the results I got for our player character, even if did change a fair amount from the original concept.
The two biggest hurdles was definitely learning to juggle both learning zBrush and anatomy. This is really my first human character and I feel that I've done a decent job on him. He's definitely not perfect - his face is still a little off to me and the skin textures can still use more work. But for a first attempt I've learnt a lot and I am looking forward to applying that knowledge to a new project.
As an additional note I wish I also picked a different hairstyle, as the one I went for was very hard to create and make convincing. But I gave it my best attempt.

My goal with the bird was to update his textures to support PBL.
I didn't add much extra to the actual model, other than some additional feathers:

After exporting the new maps from the updated zBrush sculpt, I created and messed around with the materials to get the effect I was after:

I used the hair material for the feathers, and two diffrent flesh materials for the rest of the body.
I took some inspiration from From Software's Bloodbourne when it came to the texture of the bird:

Namely I wanted him to be darker, wetter and overall more gross and intimidating to the player.
Therefore I upped the gloss values of the model slightly.
Like I did with the Wurm, I took a pose from one of Nik's animations:

Then when all was in place, I created some renders in Marmoset:


I'm really glad I updated the textures. I feel the new materials look really great and bring out more detail in the bird as well.
In the future I think I would like perhaps use less planes on the bird's mesh, have them be bigger and longer to add more overall shape.
I also think I should of made the actual mesh higher poly, to better capture the sculpted detail.
Still I'm pleased with the results, and the model proved to be a good learning experience for me.
Completing the gameplay is the grapple pull. This, as the name might suggest, is the player pulling the grapple after throwing it. It is near exactly the same as the grapple climb but the returned "grapple point" is always at the top center of the front face of the box collider:
 Imagine if the black box is the front face of a box collider. If the purple dots are all different raycast hit points, the returned point is always the bottom of the blue line. I chose to do it this way as the grapple pull point are small targets and by ensuring the point to be the bottom of the blue line, you can make the hook line up with other
 Like so!!
So next up is the action after you pull. How to go about that. I thought of it like this. The guy who draws the lottery numbers out each week doesn't then go around to every person who bought a ticket's house to check if they won or not. The people who bought the tickets check the numbers. The same with the grapple system. The grapple doesnt go around and ask each point if they are the one it hit. The points themselves individually check to see if the grapple hit them, if it did, perform the required action.
In our case, every one of the grapple pulls triggers an animation, and usually a particle effect. So, I made a script that you give an animation and optionally a particle effect. You attach it to your desired object and assign these parameters and also the grapple point collide itself. THen the sctipt will detect when that point has been grappled and will trigger the event. The grapple collider is then destroyed.
 The example above is for a more specific action, the pull over of the lion statue. This one required some more options to turn on and off collisions at points in the animation. The simpler, no object specific one only takes an animation and the grapple point at the moment. I need to finish it off but I'm not sure if ill have time to.
So next up is the action after you pull. How to go about that. I thought of it like this. The guy who draws the lottery numbers out each week doesn't then go around to every person who bought a ticket's house to check if they won or not. The people who bought the tickets check the numbers. The same with the grapple system. The grapple doesnt go around and ask each point if they are the one it hit. The points themselves individually check to see if the grapple hit them, if it did, perform the required action.
In our case, every one of the grapple pulls triggers an animation, and usually a particle effect. So, I made a script that you give an animation and optionally a particle effect. You attach it to your desired object and assign these parameters and also the grapple point collide itself. THen the sctipt will detect when that point has been grappled and will trigger the event. The grapple collider is then destroyed.

To add some narrative to our game, we decided to focus on some story telling elements within our game.
We've already established that the player is a treasure hunter, seeking an Amilarry Sphere. But why is he in this strange world?
We decided to add a voice-acted monologue to the character, where he would make comments on the world around him.
This would act as both a narrative element - such as explaining why he's there, and what he's after. And also some of his monologue would act as guidance and tutorials to the player - such as commenting on being able to use his grapple on a certain object.
As part of this process I wrote a script for the character's Monologue - which incorporated some narrative ideas:


We wanted our storytelling to be somewhat subtle - rather than a play by play. But I made sure to have the dialogue reflect the character's thoughts so that he can provide context to why he is there.
In addition to this, we wanted to flesh out the lore of the world.
We had the idea of certain objects in the world, that could be triggered to play a memory (voice over) of their previous owner. This creates a sense of a more living world, and that adds some mystery to the it:

We had three sessions in the sound room.
The first session we got used to using the equipment and recorded the Hero's initial monologues. We had a few of us try to try and decide who would be best for the role.
The second time we repeated this process, giving people more preparation time.
In our third and final session, we had a variety of different actors from other courses to voice the four memory characters.
We hope to include these Monologues for the degree show build, and have them trigger appropriately.

A quick update to the Gorge Bridge.
One of the ideas we had was for the giant Wurm in our scene to smash the Gorge-Bridge, with the resulting rubble creating floating platforms.
To achieve this I simply broke up the bridge I already had:

I mainly deleted polygons, then used the cap or collapse tools to cap off the ends.
When it came to mapping the broken ends, I simply uv mapped them to use the same texture as the gorge bridge's cap:

I also used a script named vorosfrag to decimate and destroy one of the platforms so that they can be turned into rubble:


This was just a quick way to create some platforms to use in our game, but I feel it worked quite well.

If I have more time I would very much like to experiment more with the shatter script, I feel it can create an interesting atmosphere with the floating rubble and can add to the surrealness of our scene.


